Rainbow marble cake

This cake is super fun and colourful – perfect for a birthday! I made it for my friends 30th birthday dinner. It’s just a simple light and airy sponge cake with a pop of colour. You can also sub the food colouring for whatever colours you like!

Ingredients:

For the cake:
190g salted butter (softened at room temperature)
190g caster sugar
3 eggs
190g self-raising flour
1tsp baking powder
75ml milk
blue and pink food colouring (extra strong/gel is preferable)

For the icing:
200g unsalted butter
400g icing sugar

Method:

  1. Heat the oven to 180C/160C fan/gas 4. Butter and line two 20cm loose-bottomed sandwich cake tins with baking parchment.
  2. Beat the butter and sugar together using an electric whisk until light and fluffy. Whisk in the eggs, one at a time.
  3. Fold in the flour, baking powder and milk.
  4. Divide the mixture between three mixing bowls.
  5. Colour one of the batters blue and another pink, starting with a little colouring, then adding more for a deeper finish. Leave one of the bowls of batter uncoloured.
  6. Spoon a heaped tablespoon of blue batter into the centre of the first tin, then pink in the second, and plain in the third. Working quickly so that it doesn’t spread too much, add another dollop of a different coloured batter on top of each one. Don’t wait for the batter to settle or spread, just keep alternating the colours until you run out. The weight of each layer will cause the batter to spread as you go, and create the marbled effect.
  7. Bake for 25-30 mins or until firm to the touch. Leave to cool on a wire rack and meanwhile prepare your icing. You should ice the cakes only once they’ve cooled down!
  8. For the icing, beat the butter and icing sugar with an electric whisk/stand mixer until fluffy.
  9. Once your cake has cooled, spread your icing on the top of the first cake sandwich and place the other on top.

Afternoon tea at the Ritz

Overall: 9/10

It had been my lifelong dream to have afternoon tea at the Ritz, and last month I finally got to go! It really was as incredible and glamorous as I expected it to be. There was a piano playing in the background, all the varieties of tea that you could ask for, and the most delicious sandwiches and scones I’ve ever eaten!

The chefs have taken your boring sandwich combos and made them a hundred times better. Who knew that a boring cucumber sandwich could taste so delicious with the addition of some fresh dill? Plus, they were all served on fluffy bread or in the case of the egg mayo, a brioche bun – so, not your average sarnie. You’ll get two rounds of sandwiches and unlimited tea for £60 a head so it’s expensive but exceptionally good value for money. You’ll definitely not leave hungry.

The cakes were so beautifully presented, and you’re sat in an exquisite tea room, which all adds to the elegant experience. The scones were even served warm and fresh out the oven. It’s perfect for a special occasion or treat.

It’s exceptionally difficult to reserve a table for tea, so I’d recommend booking far in advance! You could also do what we did and look out for cancellations if you’re able to be spontaneous. It was easily the best afternoon tea I’ve ever had!

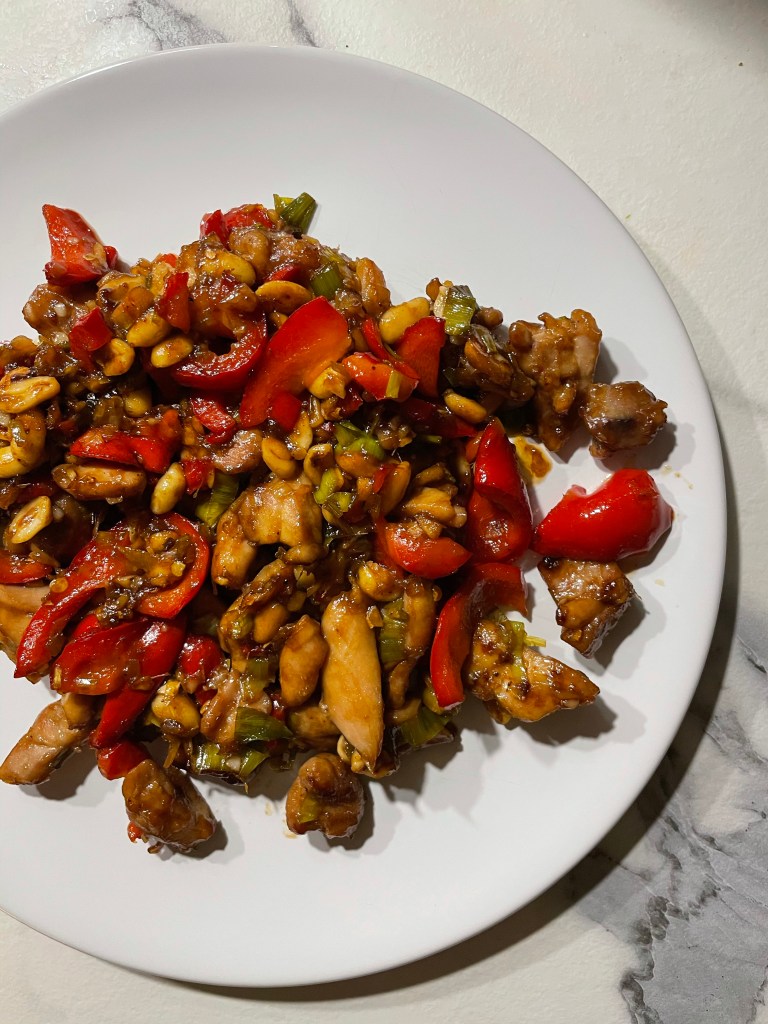
Kung Po Chicken

This recipe for kung po chicken is the ultimate fakeaway! It tastes a lot like the version you’d get from your local Chinese thanks to a few key sauces and a delicious marinade, but it’s perhaps less greasy!

There’s lots of flavour throughout the dish from the Sichuan pepper, hoisin sauce and the sake. It does require stocking up on a few specialist ingredients, but nothing you wouldn’t find in a Sainsbury’s or Waitrose. They all last a while in your fridge or store cupboard so you can make this dish over and over again. If you can pop into an Asian supermarket you’ll find the best brands!

It goes well alongside some fluffy egg fried rice or even just plain jasmine rice! If you don’t eat meat you could sub the chicken for aubergine or mushroom.

Ingredients (serves 2):

Marinade:

  • 4 chicken thighs (boneless and skinless
  • 2 teaspoons cornflour
  • 2 tablespoons sake
  • 1 tablespoon light soy sauce

Dressing:

  • 1 tablespoon hoisin sauce
  • 1 tablespoon light soy sauce
  • 1 teaspoon dark soy sauce
  • 1 teaspoon rice wine vinegar
  • 1 teaspoon caster sugar

Stir fry:

  • 1 red pepper, chopped
  • 1 onion, chopped
  • 5 cloves garlic
  • 1 teaspoon Sichuan peppercorns, ground
  • Thumb sized piece of ginger
  • 2 tablespoons salted peanuts
  • chopped red chillies (optional)

Method:

  1. Chop your chicken thighs into medium sized chunks and marinade in the sake, cornflour and the soy sauce. Stir together and leave for at least an hour.
  2. Prepare your dressing in a small bowl by mixing all the ‘dressing’ ingredients together. Leave aside, this will be poured over your stir fry right at the end.
  3. Place 2 tablespoons vegetable oil in a frying pan on a high heat. Leave to warm up for 2-3 minutes as you want to add your ingredients in when the oil is piping hot.
  4. Add your chicken to the pan and cook for 3-4 minutes until brown. Add in your onion and pepper and cook for another 3-4 minutes then add the ginger, garlic, Sichuan peppercorns, peanuts and chillies and cook for another minute, continually stirring.
  5. Turn the heat off and immediately pour the dressing over and stir it into your stir fry. You don’t want to cook the dressing on heat as it will burn!
  6. Serve alongside jasmine rice or fluffy egg fried rice.

Kol

Overall: 10/10
Location: Marylebone

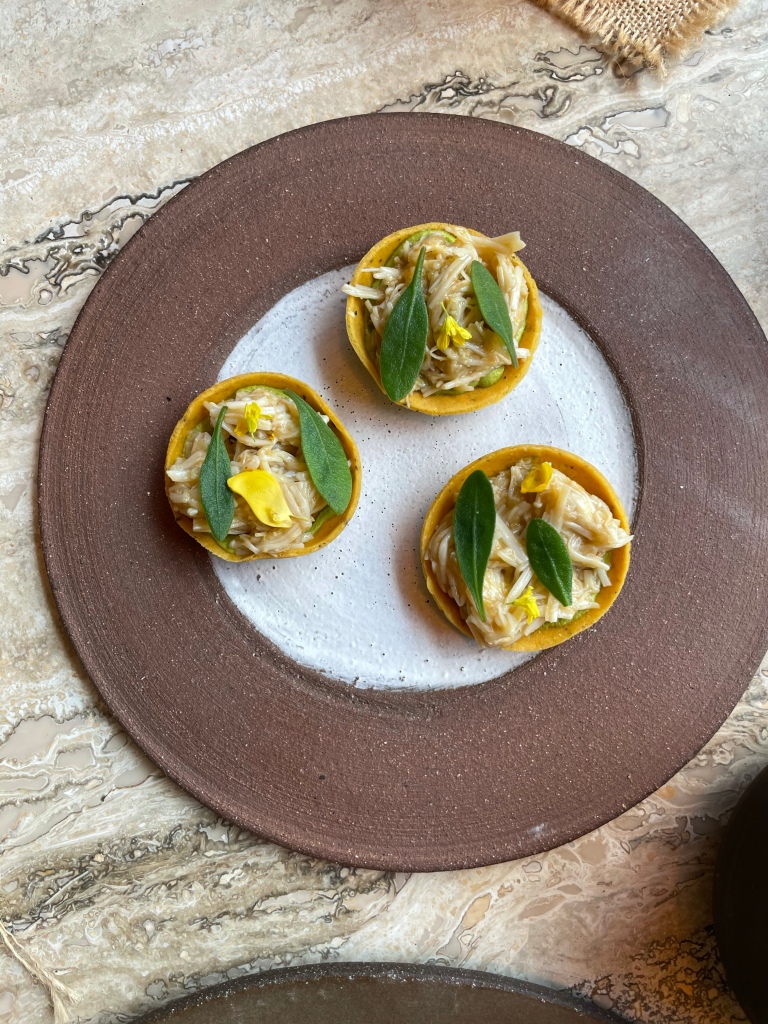
Kol, the new Mexican restaurant run by the former head chef of Noma Mexico, Santiago Lastra, is unlike any dining experience I’ve had in London. The Noma vibes are evident with the open kitchen where you can see your meal being prepped, the staff who treat you like royalty, and the rustic interiors that make you feel a little like you’re in Mexico! It’s an upscale restaurant great for a special occasion but getting a reservation requires willpower and planning!

There are three spaces, the chef’s table, the main restaurant and the Mezcalzeria, a homage to Mexico’s Mezcal bars. The first two require bookings but the Mezcalzeria takes walk ins for drinks and nibbles comprising of Mexican street food.

The menu in the main restaurant is a tasting one. I went for the vegetarian option at £70, which is on the lower end of tasting menus in London. Given how incredible it was I would have paid more! What I loved about the menu is that everything felt well-considered, from the ingredients which are locally sourced to the flavour pairings and even the plates and bowls that were sourced from a range of ceramicists to suit each dish. The team will tell you where your food has come from, which makes the experience more special.

Warmth is a key theme, from the ambience through to the food where there’s a range of Mexican chillies woven throughout the meals (make sure you tell the team if you’re not a fan of spice as they can adjust your dishes!).

Highlights for me included the Quesadilla which featured an unusual combo of cheese, pistachio, black mustard and courgette but worked so well when dropped inside the warm tortilla. I also enjoyed the chocolate steam cake dessert which was probably the softest and spongiest cake I’ve ever eaten, and was served in a parcel you had to unwrap at the table.

If you’re a foodie, you’ll have to add Kol to your list. It was easily one of my top dining experiences in London, so it’s received a 10/10 for me, the first ever on my blog!

Cooking with Comté

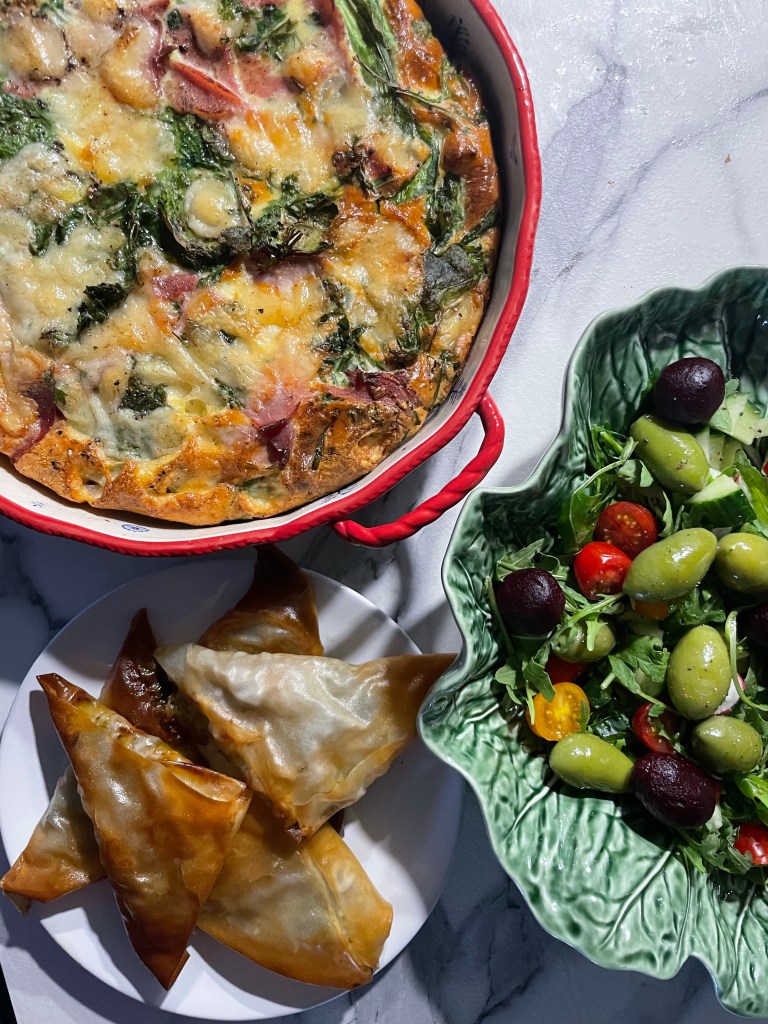
I was very kindly gifted some of my favourite cheese of all time – Comté – and asked to try out a few recipes that British chef Laura Pope had developed, these can be found below. Both the frittata and the filo parcels are perfect for summer dinners and very easy to make. Personally I think ham and Comté is the ultimate combo so I used this in both my dishes but you can tailor the recipe!

For those of you unfamiliar with what Comté tastes like, it’s a fairly unique French cheese that is handcrafted 365 days a year in France, each wheel with its own unique flavour. It’s not too strong and overpowering yet still has a delicious distinct salty flavour that tastes great on its own or melted into hot dishes. You can find out more on their website: www.comtecheese.co.uk.

Comté Frittata with Summer Vegetables

  • 1 tablespoon light olive oil
  • 1 onion, sliced thinly
  • 8 large free-range eggs
  • 1 tablespoon plain flour
  • 115ml single cream
  • 200g medium Comté (12 to 18-month) – 150g grated and 50g cut into long matchsticks
  • 25g soft herbs, e.g. parsley, basil, dill, chives or mint, leaves roughly chopped
  • Knob of butter
  • Seasonal vegetables, cooked, e.g. a few spears of griddled asparagus or charred slices of courgette
  • Optional: roasted red pepper, sliced into strips; fried lardons or chorizo; sliced ham

Method

  1. Heat a large non-stick frying pan over a medium heat, add the olive oil. Add the onion and cook for about 10 to 15 minutes until it is soft and lightly golden, but do not let it burn.
  2. Heat oven to 190℃ (170℃ fan).
  3. In a large bowl, whisk the eggs, flour and cream by hand and season with ¾ teaspoon of fine salt and a few grinds of black pepper. Mix in the herbs and the grated Comté.
  4. Add the onion to the egg mixture and stir it in.
  5. Return the frying pan to the hob on a medium-high heat, add a knob of butter and, once it is foaming, pour in the egg mixture. Lay over the green vegetables and, if you are using them, the peppers, lardons, chorizo or ham. Cover with the lid and cook for 5 minutes until a ring about 1 to 2cm thick around the edge of the pan is set, but still runny in the middle.
  6. Scatter the sticks of Comté over the top of the frittata and put it in the centre of the oven, uncovered, for about 6 minutes until it is just set – you can turn on the grill for the last 1 to 2 minutes to brown the top if necessary, but watch it carefully so it does not burn.
  7. Remove the pan from the oven and let it sit for 5 minutes. Carefully slide the frittata out of the pan (do not flip it over) onto a large plate or serving board and slice it into wedges. Serve warm, or it is wonderful for a picnic once it has been refrigerated.


Filo Parcels of Comté, Courgettes, Spinach & Leeks

Ingredients

  • 2 tablespoons light olive oil
  • 2 leeks, trimmed and washed thoroughly, then finely sliced
  • 2 courgettes, coarsely grated and placed in a sieve to drain excess liquid
  • 80g baby leaf spinach, washed and roughly chopped
  • 200g medium Comté (12 to 18-month), cut into 1cm cubes
  • 7 sheets filo pastry, measuring about 25x45cm
  • 75g unsalted butter, melted
  • Optional: 1 or 2 slices of ham, finely chopped

Method

  1. Place a large frying pan over a high heat, add the olive oil, then the leeks. Season with a little fine salt and a few grinds of black pepper, then stir to coat the leeks in the oil and seasoning. Cover the pan, turn the heat down a little to medium-low and sweat the leeks for 10 to 15 minutes until they are soft and a little golden – stir and check regularly so they do not burn and turn the heat down if necessary.
  2. Remove the lid, raise the heat to high, add the courgettes and cook for a further 3 to 4 minutes, stirring regularly, then add the spinach and cook, still stirring, for about 2 minutes so that it wilts and some of the liquid cooks off. Check the seasoning and add more if needed, but not too much as the Comté will add plenty of flavour. Transfer the vegetables into a bowl and leave to cool before stirring through the cubes of Comté (and the ham, if using).
  3. Heat the oven to 180℃ (160℃ fan).
  4. Melt the butter in a small saucepan and lay out a sheet of filo pastry on a clean, cool worktop. Brush some butter over the filo and cut it lengthways into 2 strips. Put about 2 tablespoons of the mixture at the bottom of each strip and fold each one over diagonally to make a triangle, then continue to fold over up the length of the pastry. Repeat with the remaining filling and filo pastry.
  5. Arrange the parcels on a lined baking sheet and brush the tops with more butter. Bake in the centre of the oven for 18 to 20 minutes, or until they’re golden brown and cooked through. Serve immediately, but beware the piping hot filling!

Garlic, Rosemary and Black Olive Focaccia

I’ve played around with so many focaccia recipes this past year, given there was not much else to do during lockdown! But with most of the recipes I tried I failed to reach that light and airy texture that you get in a good Italian restaurant. I then discovered the ‘slapping’ kneading technique – you literally have to slap the dough against the counter and pick it up again – and my life changed forever, I was left with a soft and airy loaf of bread. I also place a tray of water on the bottom of the oven which creates steam during the cooking process, which all contributes to creating the perfect loaf of bread.

I love olives and garlic so have stuffed my loaf with these, but you can omit these or substitute with sundried tomatoes, regular tomatoes, onions or cheese for example.

Ingredients:
Makes one large loaf

  • 500g strong white bread flour,
  • plus extra for dusting
  • 8g dried yeast
  • olive oil
  • 4 cloves of garlic, peeled and halved
  • handful of black olives
  • 3 sprigs of fresh rosemary
  • 6g fine sea salt

Method:

  1. Place the flour into a large bowl, and make a well in the middle. In a jug, mix the yeast and 360ml of lukewarm water, and leave for a few minutes. Gradually pour the yeast/water mixture into the well, stirring with a fork and bringing the flour from the outside to form a dough. The dough will be pretty wet but don’t be alarmed and don’t add more flour, it will start to come together in the kneading process.
  2. Knead the dough on a surface lightly dusted with flour by picking it up and slapping it back down. Continue for 8-10 mins or until the dough is smooth and springy.
  3. Grease the same mixing bowl you used for the dough with 1 tablespoon of olive oil using your hand. Place the dough into the bowl, cover with a damp tea towel and leave to prove in a warm place for at least an hour. I like to turn my oven on for 1 – 2 mins and then turn it off again to create a warm space ideal for proving.
  4. When the dough has almost doubled in size, leave in the bowl and sprinkle a little water on top and add half the sea salt, then fold the dough a few times. To fold the dough, wet your hand with a little bit of water and grab the dough at one side, lift it up, and fold it over on top of itself. Fold the dough four or five times. Then cover the bowl and let the dough rest in a warm place until doubled in size again, this should take roughly another hour.
  5. Line a deep baking tray with baking parchment (about 40cm x 30cm). Take the dough, add 1 tablespoon of olive oil on top and spread the dough all around the tray by pressing it with your fingers and then use your fingers to make dimples. Place the olives, the halved garlic cloves and the sprigs of rosemary on top and press them into the dough. Try to place them fairly deeply into the dough so that they don’t burn. Drizzle with 2 tablespoons of olive oil and sprinkle the remaining sea salt all over the dough.
  6. Preheat the oven to 230°C/gas 9 and place a small tray of cold water at the bottom of the oven (this will be used
    to create steam in the oven and create the perfect environment for the bread to bake).
  7. Bake the focaccia for 15 to 20 mins, or until nice and golden.
  8. Once the focaccia is out of the oven, drizzle with 2 tablespoons of olive oil on top and let it cool for at least 30 mins.
  9. Store in foil or an airtight container at room temperature for up to a week. It also freezes nicely!

Easter Nests

Easter doesn’t feel like Easter with out some nest cakes. They’re literally one of the easiest ‘bakes’ on the planet. Most recipes normally tell you to use rice krispies or cornflakes but I find that shredded wheat creates a better nest like effect! The mix of chocolate, drinking chocolate, butter and golden syrup is super tasty.

Ingredients:
Makes 12- 15 nests

  • 200 g Milk Chocolate 
  • 200 g Dark Chocolate 
  • 100 g Unsalted Butter
  • 100 g Golden Syrup
  • 1 tablespoon Drinking Chocolate
  • 150g Shredded Wheat 
  • 80g packet of Mini Eggs

Method:

  1. In a large saucepan add your butter, chocolate and golden syrup on a low heat until melted. Then stir in your drinking chocolate.
  2. Crush your shredded wheat into small pieces and then stir into your chocolate mixture.
  3. Line a baking tray with baking parchment. Scoop your chocolate/shredded wheat mixture into little nest shapes and lay out on the tray, then add your mini eggs on top to decorate.
  4. Leave to set in the fridge for at least 5 hours.

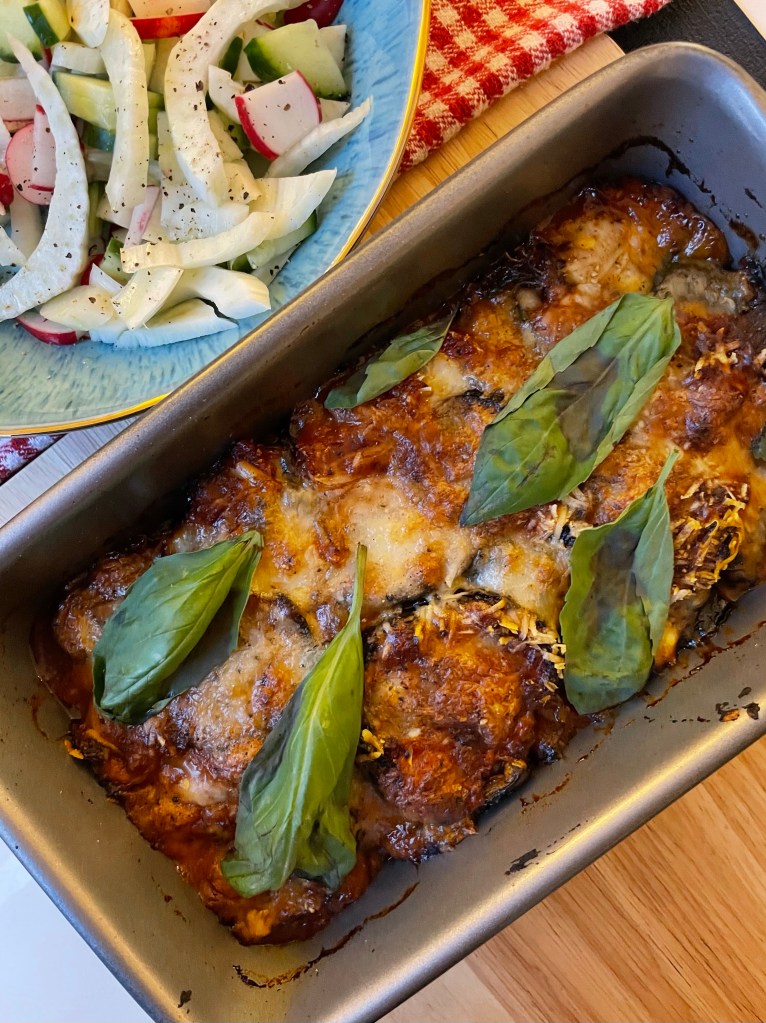
Aubergine Parmigiana

Aubergine parmigiana is such a delicious dish, it’s basically multiple layers of aubergine, a slow cooked herby tomato sauce, and parmesan and mozzarella cheeses (drool). I personally think it goes well with a side salad and a crusty garlic bread or focaccia to mop up the sauce. YUM.

This recipe serves 2, and is a mini parmigiana. I’d recommend using a standard sized loaf tin (23 x 13 x 7 cm) as you’ll want to get lots of layers in. If you’re going to double up on the recipe and make a larger dish you can use a larger sized baking tray.

Ingredients:
Serves 2

  • 1 large aubergine
  • olive oil
  • 1 red onion, finely chopped
  • 3 gloves of garlic, minced
  • 1 tablespoon dried oregano
  • 1 tablespoon tomato puree
  • 400g chopped tomatoes
  • 1 tablespoon sugar
  • handful of fresh basil (roughly 15g)
  • 150g mozzarella
  • 30g parmesan cheese, grated
  • salt and pepper

Method:

  1. First make your slow cooked tomato sauce. Pour 2 tablespoons olive oil into a medium saucepan with a lid on a medium-high heat and then add your onion with salt and pepper. Fry for 2-3 minutes until soft and then add your tomato puree, garlic and oregano and reduce the heat to medium-low and cook for 10 minutes.
  2. Add the tinned tomatoes, sugar and basil and stir. Place the lid on the pan and leave to simmer for 20 minutes minimum (the longer you cook it, the more flavoursome it will be!)
  3. Remove the stalk from the aubergine and slice into 1cm thick slices. Lay out your slices on a chopping board and use a pastry brush or kitchen towel to rub a dash of olive oil onto each slice (on both sides). You don’t want to add to much oil here. Sprinkle salt and pepper over the slices.
  4. Heat a large frying pan on a high heat and add your aubergine slices, char both sides, working in batches if necessary. It should take roughly 4-5 minutes to cook each side.
  5. Preheat your oven to 190C/gas 5. Assemble the parmigiana in your loaf tin (23 x 17 x 7cm) by first adding a thin layer of tomato sauce, then a layer of mozzarella and parmesan and then a layer of aubergine. You’ll end up with approximately 4 layers of each type so make sure you space out your ingredients accordingly. Repeat the layers until you’ve used all the ingredients.
  6. Top with a layer of mozzarella and parmesan. Bake for 45 minutes or until golden, crispy and bubbly.

Hot Cross Buns

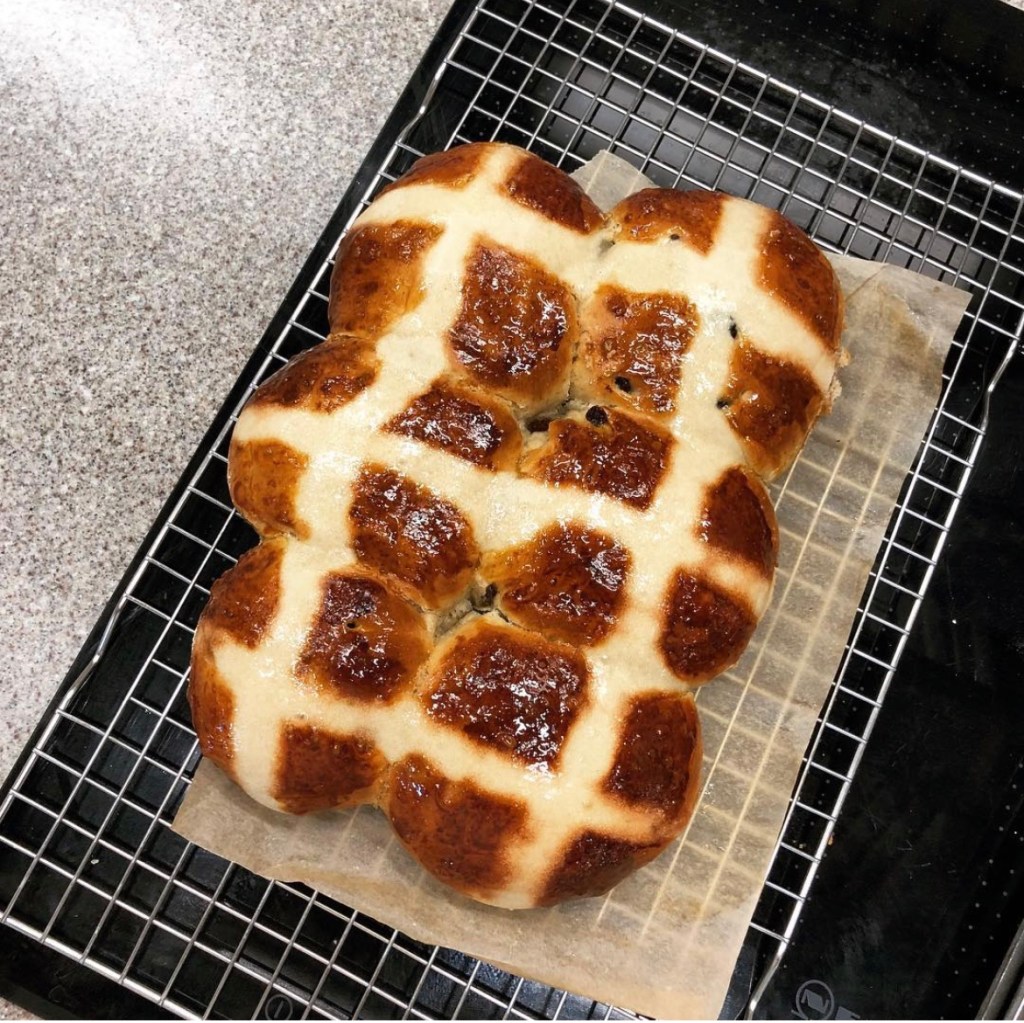
Easter is coming up, which means warm, glossy hot cross buns are on the menu. My birthday is around Easter, and two years ago (my last pre-pandemic birthday *sigh*!) I went on a hot cross bun making class on my birthday at a cookery school in London where we learnt how to make the perfect hot cross bun. They’re worth making from scratch, I promise you’ll never buy a store bought version after this! They’re not too difficult to prep, plus your kitchen will smell amazing afterwards! You’ll need a piping bag for this recipe.

Ingredients:
Makes 6 buns

  • 250g strong white bread flour
  • 35g caster sugar
  • 1 teaspoon mixed spice powder (you can also use allspice)
  • 1/2 teaspoon ground cinnamon
  • zest of 1 lemon
  • zest of 1 orange
  • 5g salt
  • 5g fast-action dried yeast
  • 20g butter
  • 150ml whole milk
  • 1 egg, beaten
  • 100g sultanas
  • olive oil, for greasing
  • 35g plain flour
  • 1 tablespoon golden syrup

Method:

  1. Mix the bread flour, sugar, mixed spice, cinnamon and lemon and orange zests in a bowl. Move this half of the mixture to one side of the bowl and then add the salt and yeast on the opposite side.
  2. Melt the butter in a saucepan, and warm the milk in a separate pan or in the microwave (until just warm/tepid).
  3. This step and step 4 can either be done by hand or using a stand mixer with a dough hook. Add the butter and half the milk to the dry ingredients, then add the egg and use your hands to bring the mixture together, incorporating the dry ingredients from the edges of the bowl as you do. Gradually add the remaining milk until you have a soft dough. You may not need all of the milk.
  4. Knead the dough on a lightly floured surface for 10 minutes and incorporate the sultanas and lemon and orange zest into the dough. The dough should be silky and elastic and form a smooth ball.
  5. Oil a large mixing bowl and place the dough inside. Cover with clingfilm and leave to prove in a warm place for 1 hour or until doubled in size. I usually warm up my oven for 3-5 minutes, turn the heat off and then place the bowl in there to prove.
  6. Divide the dough into 6 balls and line a baking tray with baking parchment and place on top, fairly close together and flattening them slightly. Cover in clingfilm and leave to prove again for 60 minutes until doubled in size.
  7. Preheat your oven to 220C/200C Fan/Gas 7.
  8. For the ‘cross’ toppings for your buns, add your plain flour to a bowl with 50ml water. Mix together to make a paste and spoon into a piping bag. Pipe a cross on each bun.
  9. Bake for 15-20 minutes until pale golden-brown, turning the baking tray round halfway through if necessary.
  10. Melt the golden syrup in a pan and while the buns are still warm, brush the buns with the syrup to give them a shine and then leave to cool on a wire rack.

Za’atar Cacio e Pepe

I was really hesitant to play with the classic cacio e pepe recipe, as it’s such a classic – butter, cheese and pasta is an almost perfect combination in my opinion. However, the addition of za’atar is such a game changer, and works SO well. For those unfamiliar, za’atar is a Middle Eastern herb that usually includes a combination of dried oregano, thyme, marjoram, sumac and toasted sesame seeds. It’s rich and flavoursome but isn’t overpowering, and it goes incredibly well with cheese! This recipe is based on an Ottolenghi recipe that I’ve experimented with and adapted to make it easier to prepare (I personally found the original recipe had a few pitfalls and did not have enough cheese for my liking!)

Ingredients:
Serves 2

  • 200g spaghetti
  • 25g unsalted butter
  • 2 tablespoons olive oil
  • 5g za’atar
  • 1 teaspoon freshly cracked black pepper
  • 15g pecorino cheese
  • 85g parmesan cheese
  • Salt
  • Sumac, to garnish (optional)

Method:

  1. Bring 1L of water to boil in a saucepan on a medium-high heat and add 1 teaspoon salt. Add the spaghetti and cook for 9 minutes (you want it to be al dente).
  2. Drain your pasta, but reserve all the pasta water as you’ll need this for your sauce.
  3. In a large saucepan (large enough to eventually hold all your spaghetti), add the butter and olive oil on a high heat for 1 minute, then add your za’atar and cook for another minute. It’s really important you add olive oil when cooking your butter, otherwise it will burn! (A huge problem I found with the original recipe).
  4. Add 3 ladlefuls of your reserved cooking water to the saucepan and boil on a high heat for 5 minutes, it should reduce a little.
  5. Turn the heat to low. Add the spaghetti to the sauce and stir so it is covered in your sauce. Add the parmesan and continue to stir so it melts through, then add your pecorino until melted and season with salt and the cracked black pepper. If your sauce is looking a little thick you can add more pasta water. Garnish with sumac.