Flatbread Pizzas

img_9927

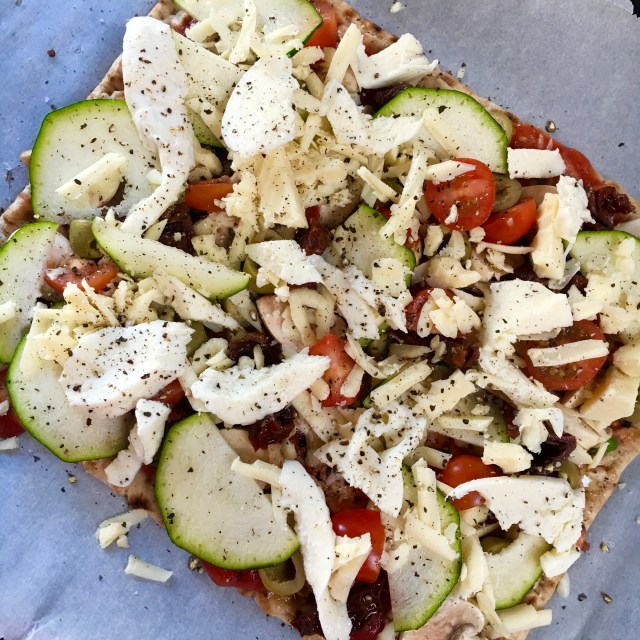
If you’re looking for a super quick yet totally delicious DIY meal, you have come to the right place! These flatbread pizzas are bursting with Italian flavours and massive amounts of veggies, although the toppings are optional, you could try adding salami, chicken or a selection of your preferred vegetables instead of what I have suggested.  This is one of my go to meals when having friends round for lunch – its just so easy to make (yet seems impressive!)

img_9910

I came up with this recipe myself after discovering Warburton squares. I love them, they’re really versatile and can be used to make sandwiches, wraps, garlic bread and even pizza. They’re available in most supermarkets, however I find they are so popular nowadays that they are regularly sold out *sob*. So when I spot them in the supermarket I buy a stackful and freeze them (top tip for any kind of bread!)

img_9911

Overall time needed: 30 minutes

Ingredients:

  • Flatbread – I use Warburton squares but any type will do
  • 150g chopped tomatoes
  • 6 cherry tomatoes, chopped in half
  • 10 fresh basil leaves, roughly chopped
  • 4 cloves of garlic, finely chopped
  • pinch of salt and crushed black pepper
  • 50g mozzarella, chopped into small chunks
  • 25g cheddar cheese, grated
  • 2 mushrooms, sliced
  • 1/2 a courgette, finely sliced
  • 15 olives
  • 4 sundried tomatoes

Method:

  1. Preheat your oven to gas mark 6/200 degrees centigrade
  2. Place your flatbread on a baking tray and spread the chopped tomatoes evenly on top
  3. Sprinkle the garlic, basil leaves, salt and pepper on top.
  4. Add your mushrooms, courgette slices, cherry tomatoes, sundried tomatoes and olives on top, followed by the cheese.  Then add a bit more black pepper on top.
  5. Place in the oven for 15 minutes, until the cheese is slightly golden.  Enjoy!

Chicken in a mushroom & cream sauce

This chicken stew is quickly becoming one of my favourite midweek meals this January when it’s sooo cold and dark outside! (boo) It’s super quick to prepare and is delicious alongside some creamy mash or roast potatoes. 

Overall time needed: 30 minutes

Serves 2 people

Ingredients 

  • 1 tbsp sunflower oil 
  • 3 chicken breasts, diced
  • 350ml chicken stock
  • 6 cloves garlic 
  • Salt and crushed black pepper (to taste)
  • 25g butter 
  • 1 leek, chopped 
  • 200g mushrooms 
  • 150ml white wine 
  • 150 ml double cream


Method
:

1. Heat the oil in a frying pan and then add the chicken and cook on a medium heat until slightly golden. 

2. Add the garlic, leek, and mushrooms. At this point I like to reduce the heat and let the veggies ‘slow cook’ to bring out maximum flavour. Leave to cook for 5-7 minutes. 

3. Add the White wine and chicken stock and simmer on a low heat. 

4. Add the double cream followed by the salt and pepper and leave to simmer for 5 minutes. Bon apetit!

Cacio e Pepe

Total time required: 15 minutes
Makes 2 servings

img_8367

Ever since my trips to Rome and Venice earlier this year I’ve been truly obsessed with cacio e pepe pasta.  It’s so simple with 3 main ingredients, cheese, butter and pepper (what’s not to like?!). So I decided to whip up a batch at home.  It was so quick and easy – the ultimate lazy pasta recipe.

The dish has been recently popularised in London, through the newest pasta bar, Padella. But there are a number of other places in London where you can find this amazing dish!  My favourite being Cicchetti…just look at that cheese!!

img_7873

Cacio e pepe – Cicchetti, Piccadilly 

Cecconi’s in Mayfair also serve a great version, although slightly cheesier than Cicchetti’s.

img_8100

Cacio e pepe – Cecconi’s, Mayfair

Ingredients:

  • 1 tablespoon salt
  • 350g good quality spaghetti (I used De Cecco, which is also popular in Italy)
  • 170g grated pecorino cheese
  • 3 tablespoons freshly crushed black pepper
  • 50g unsalted butter
  • 30g  grated parmesan cheese

Method:

  1. Add the salt to your saucepan of boiling water and boil the spaghetti as per the instructions on the packet (usually around 10 minutes)
  2. Drain the spaghetti into a colander but hold back a cup of the pasta water.
  3. Place the spaghetti back into the saucepan and add the cup of pasta water and heat on a low heat.
  4. Add the pecorino cheese, butter and black pepper to the pan and stir until melted.
  5. Serve, and add the grated parmesan on top if you wish.


Apricot and Ginger Energy Bites

With cold and flu season just around the corner I’ve been trying to incorporate more ginger into my daily food intake! Ginger is one of the healthiest spices on the planet, its great for digestion and warding off colds and flu, however, most of us don’t eat enough since its… well…an acquired taste! Blending them into these energy bites reduces its sharpness whilst also adding a hint of spice to these otherwise sweet treats.

Energy bites are my new favourite snack – they’re super easy to prepare, very healthy, can be stored for weeks and are perfect for taking to work to zap away the pre-lunch hunger pangs! Check out my cacao energy bites too if you haven’t done so yet!


Total time required: 15 minutes

Makes approximately 20 energy balls

Ingredients:

  • 50g cashew nuts
  • 50g walnuts
  • 1 tablespoon chia seeds
  • 80g dried apricots
  • A fresh piece of ginger, about 4cm – finely chopped
  • 2 tablespoons honey

Method:

1. Place the nuts into a food processor and blitz until they are broken into tiny shards.

2. Add the apricots to the food processor and blitz again until the nuts and apricots are blended together.

3. Add the honey, ginger and chia seeds and process again until a sticky dough has formed

4. Roll into balls using your hands

Store in an air tight container in the fridge for up to 3 weeks! Bon appetit.

Rainbow Cookies


This recipe combine two of my favourite things…. Cookies and Smarties! They are very colourful so look super fun and impressive (but are totally simple to make). I’m not going to pretend these are healthy in any way… But like most unhealthy treats, they taste amazing!
Prep time: 20 minutes 

Makes approximately 30 medium sized cookies.

Ingredients:

  • 475g plain flour
  • 1 teaspoon baking soda
  • 1/8 teaspoon salt
  • 120g butter (melted)
  • 140g caster sugar
  • 120g brown sugar
  • 2 large eggs
  • 1 teaspoon vanilla
  • 150g Smarties 

Method:

1. Preheat the oven to gas mark 5 and line a baking tray with greaseproof paper.

2. Mix the flour, baking soda and salt in a medium sized bowl using a wooden spoon.

3. In another bowl cream the butter, sugar and the brown sugar using an electric mixer. Add the eggs and the vanilla and mix on medium speed until combined.

4. Add in the flour mixture on low speed until combined. Then add in the Smarties and gently fold it into the mixture using a wooden spoon.


5. Scoop a small ball of dough into the palm of your hand and flatten. Place the dough ball onto your baking tray.


6. Bake for about 8-10 minutes. The cookies may feel soft when you remove them from the oven, but they will become crisper when cooled.


7. Remove the cookies from try and let them cool on wire racks. Store in an airtight container for up to 3 weeks. Then, enjoy!

Cacao Energy Bites


I’m jumping on the Energy ball bandwagon with these cacao energy bites! They are super filling, and taste like mini chocolates. 

They are perfect as a healthy snack for work or a pre-gym boost! Plus, they are so easy and quick to make, require no baking, and can be made in big batches and stored in the fridge for a few weeks. 

Prep time: 15 minutes 

Makes 25-30 energy balls

Ingredients:

  • 400g mixed nuts – I use almonds, walnuts and Brazil nuts 
  • 10 pitted medjool dates (if you can’t buy them pitted you can take out the seeds yourself)
  • 3 tablespoons raw cacao powder
  • 4 tablespoons runny honey 

Method:

1. Put the mixed nuts into a food processor and blitz until they are broken up into tiny shards

2. Put the medjool dates into the food processor and blitz again until the nuts and dates are blended together 

3. Add the honey and the cacao powder and process until a sticky dough has formed

4. Roll into balls using your hands

Store in an air tight container in the fridge for up to 3 weeks! Bon apetit. 

Rudolph Truffles

227003_10152343995745858_58957046_n

Photo credit: Ameer Kotecha

As the festive season draws closer, these cute Rudolph Truffles are just what you need to get in the mood for Christmas.  They’re perfect for a Christmas party, or to be wrapped and put under the tree.

Overall time needed: 4.5 hours (including 4 hours chill time)

This recipe will make 50 truffles

Ingredients:

  • 300g dark chocolate (I would recommend Asda’s Smartprice Chocolate – only 35p per 100g but is just as delicious as any premium brand!)
  • 300ml pot double cream
  • 50g unsalted butter
  • 1 packet of twiglets
  • Mini cupcake cases
  • Coloured writing icing

Method:

  1. Break the chocolate into a large glass bowl.  Pour the cream and butter into the bowl and heat on a low heat over a saucepan full of boiling water.  Stir until you have a smooth mixture.
  2. Cool for 4 hours in the fridge.
  3. To shape the truffles into balls, use a melon baller to scoop out the mixture.  To make them perfectly rounded you can use your hands at this stage.  Place in the mini  cupcake cases.
  4. Break the twiglets in half and gently poke them into the truffles to create the antlers
  5. Use green writing icing to add the eyes, and red icing for the noses.
  6. Store in the fridge in an airtight container for 3 days. Enjoy!

reindeer


Coffee & Walnut Cupcakes

baking2

This recipe is a cupcake adaptation of a traditional tea-time favourite!  The best part of these cupcakes is the mascarpone icing, which is creamy and not overly sweet like other icing types.

This recipe will make around 12 cakes.

Preparation: 15 mins
Cooking: 20 mins

Ingredients:

  • 100g butter
  • 100g light muscovado sugar
  • 100g self-raising flour
  • 2 large eggs
  • 2 tsp instant coffee, mixed with 100ml boiling water, then cooled
  • 25g chopped walnuts with 12 more for decoration

For the icing:

  • 200ml mascarpone
  • 2tbsp light muscovado sugar

Method:

  • Heat the oven to gas mark 4 and line a cake tin with cupcake cases.
  • Beat the butter, sugar, flour and eggs in a large bowl with 2tsp of the coffee mixture until creamy.
  • Add a pinch of salt and the chopped walnuts

baking day 3

  • Spoon the cake mix into the cases and bake for 18 – 20 mins in the middle of the oven until golden.

baking day 1

  • To make the icing, put the mascarpone and 2tsp of the coffee and sugar into a bowl and beat together.  The icing should be slightly runny.
  • Spread the icing on top of each cupcake and decorate with some chopped walnuts

baking1

  • If the icing is too runny, you can place the cakes in the fridge for an hour to set.  Enjoy!

baking day 2

baking7

Nutella-chocolate-chip Cookies

nutella 1


Nutella is one of my favourite baking ingredients.  If you love Nutella, then these Nutella-chocolate-chip cookies are a must-try.  They are crisp on the outside, with a soft, gooey centre.  They are quick and easy to make, and the best part is they stay as tasty the next day!

photo

This recipe was recommended to me by a friend, and will make around 30 medium-sized cookies.

Overall preparation time: 20 mins

Ingredients:

475g plain flour
1 teaspoon baking soda
1/8 teaspoon salt
120g butter (melted)
140g caster sugar
120g brown sugar
2 large eggs
1 teaspoon vanilla
60g Nutella
200g chocolate chips (I would recommend dark chocolate chips, as these complement the Nutella well)

Method:

1. Preheat the oven to gas mark 5 and line a baking tray with greaseproof paper.

2. Mix the flour, baking soda and salt in a medium sized bowl using a wooden spoon.


3. In another bowl cream the butter,  sugar and the brown sugar using an electric mixer. Add the eggs and the vanilla and mix on medium speed until combined.

4. Add in the flour mixture on low speed until combined. Then add in 30g of Nutella and gently fold it into the mixture.  You don’t want to mix the Nutella into the batter too much, in order to get ‘nutella swirls’ in the cookies.nutella 2

5. Mix in the chocolate chips using a wooden spoon.

6. Scoop a small ball of dough into the palm of your hand and flatten.  Place a small dot of nutella in the centre and fold the edges of the dough around it, and flatten slightly.  Place the dough ball onto your baking tray.

nutella 3

7. Bake for about 8-10 minutes.  The cookies may feel soft when you remove them from the oven, but they will become crispier when cooled.

8. Remove cookies from try and let them cool on wire racks.

nutella 4


nutella 5

Mojito Cupcakes

‘A cocktail in a cake’. 

mojito3

Love mojitos? Can’t resist a cupcake? Then these mojito cupcakes are for you.

Whilst on holiday I visited Cacao Sweets & Treats in Grayslake, Illinois and came across the concept of alcoholic cupcakes. (www.cacaosweetsandtreats.com) They were so good that I decided to bake a batch myself! They really do taste like a real mojito, and make a perfect dessert!

Overall preparation time : 50 minutes

Ingredients:

For the Cupcakes:

  • 115ml buttermilk
  • 115g mint leaves, bruised
  • 350g all-purpose flour
  • 1.5 teaspoons baking powder
  • 0.25 teaspoon salt
  • 115g unsalted butter
  • 235g granulated sugar
  • 2 eggs
  • Zest and juice of 1.5 limes
  • 2 tablespoons white rum
  • 0.25 teaspoons vanilla extract

To brush the cupcakes:

  • 2 tablespoons white rum
  • 2 sprigs fresh mint

For the icing:

  • 150g unsalted butter
  • 400g icing sugar
  • 1.5 tablespoons lime juice
  • 3 tablespoons white rum

Method:

  • Preheat the oven to Gas Mark 3 and line a cupcake tin with paper cases
  • Bruise the mint leaves through tapping the leaves 10 – 15 times with the back of a spoon
  • Place the buttermilk and mint leaves (for the cakes) in a saucepan over a low heat and warm until the mixture starts to steam, but do not simmer.  Remove from the heat and cover.  Leave to steep for 30 minutes then strain the mixture into a bowl using a sieve.  Make sure to press on any buttermilk solids and mint leaves to extract as much liquid as possible.

mojito1

  • In a large bowl, beat the butter and sugar together until light and fluffy.  Add the eggs one at a time and beat thoroughly. (I would recommend using an electric mixture on medium-high speed!)
  • Add the lime zest, lime juice, vanilla extract and rum.  Mix until combined.  Add the flour, baking powder and salt to this bowl and then the buttermilk mixture.

mojito2

  • Place the batter in the paper cases and bake for 25 minutes, until golden.
  • While the cupcakes are baking, combine the rum and mint sprigs in a small saucepan and warm over a low heat and remove as soon as the mixture starts to simmer.  Steep until ready to use.
  • Remove the cupcakes from the oven and cool for 5 to 10 minutes.
  • Brush the tops of the cupcakes with the mint-infused rum.
  • To make the icing, whip the butter and the icing sugar until incorporated.  Add the lime juice and rum.
  • Frost the cupcakes and garnish with a lime wedge and mini-umbrella.  Enjoy!

mojito6

mojito5