Turmeric Latte

Prep time: 5 minutes

IMG_6006

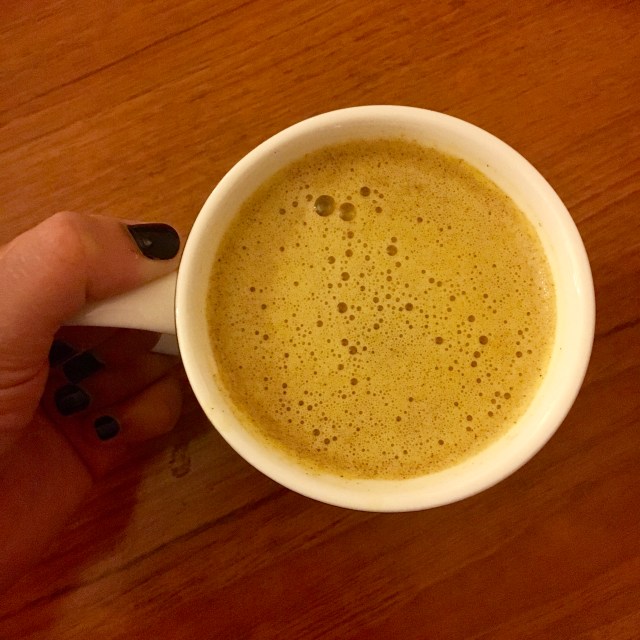
Turmeric is slowly becoming the nation’s favourite health food.  Last year, the Guardian even named the turmeric latte (also known as Golden Milk) as our ‘2016 drink of choice’. Not only is this drink super warming and caffeine free (yet tastes a bit like a chai latte), it has tons of nutritious benefits.  It’s full of antioxidants and has been proven to act as an anti-inflammatory.  This is due to the curcumin compound that is found in turmeric.  In fact, in Ayurvedic medicine, practitioners have been using turmeric to prevent serious health conditions such as heart disease and cancer.

IMG_5999

Turmeric is commonly used in cooking as a spice to add to curries and soups.  If you haven’t cooked with turmeric before, I’d recommend starting with less turmeric and building up to the full amount so that you get used to the taste.

Ingredients:

  • 3/4 teaspoon turmeric powder
  • 1/2 teaspoon ground ginger
  • 1 heaped teaspoon of honey
  • 1 heaped tablespoon of almond butter (this adds a creamy texture to the drink)
  • 350ml milk (I find almond milk goes really well with this drink but you can use any kind)
  • 1/2 teaspoon ground cinnamon
  • 1 teaspoon vanilla extract
  • A pinch of black pepper (This helps the absorption of curcumin to the bloodstream)

Method:

  1. Place all ingredients into a blender or food processor and mix until the liquid is combined and frothy.
  2. Warm in a saucepan over the stove for 1 – 2 minutes and pour into mugs.  You can use a milk frother to create a foamy texture if you like.

IMG_6007

Healthy Carrot Cake

Prep time required: 20 minutes
Serves 12 

Wouldn’t life be so much better if you could eat cake completely guilt free?  My healthy carrot cake is the answer!! It is free from refined sugar and is packed with vegetables, fruit and nuts…yet it really does taste as good as the sugary version (in my opinion).  This means its not only good as a sweet treat, but also as an afternoon snack to take to work, or even a pre-gym pick-me-up.

IMG_5970

Ingredients:

  • 320g carrots, grated
  • 80g dates, finely chopped
  • 1 tbsp honey
  • 3 large eggs
  • 150g coconut oil
  • Zest of 1 orange
  • Seeds from 8 cardamom pods
  • 160g plain flour
  • 120g desiccated coconut
  • 1 tbsp baking powder
  • 120g chopped walnuts

Method:

  1. Pre-heat your oven to Gas Mark 3 and grease and line a 20cm cake tin with baking paper.
  2. Mix the carrots, dates eggs, coconut oil and orange zest together in a mixing bowl.
  3. Stir in the rest of all the ingredients except the walnuts.
  4. Blitz the mixture in a food processor or blender and then stir in the walnuts.
  5. Pour the mixture into the cake tin and bake in the oven for 65 minutes.  You’ll know when its cooked when a knife inserted into the centre comes out clean.
  6. Store in an airtight container.


IMG_5948

IMG_5973

Pesto Pasta 5 ways

I recently read an article stating that the average Londoner spends £2,500 a year on work lunches (!!!!!) That is an awful lot of money spent largely on fairly boring sandwiches from Pret and overpriced sushi boxes from Itsu, which are also not particularly nutritious. I, personally, think this is a criminal amount of money spent on lunches, and pride myself on making tasty and cheap lunches for work that work out at no more than £1 a day (A total of £250 a year – so that’s a whopping £2250 saving annually.  To put that into perspective, that could probably get you TWO two week holidays to Bali, Thailand or New York).

Apparently the top reasons most people don’t bring their own packed lunches to work is because 1. they don’t have enough time to cook and 2. they don’t know what to make. So I’m on a quest to help people eat tastier, home-cooked lunches and save money.

The idea behind this is batch cooking. Yes, eating the same meal 5 days in a row can get a bit boring, that’s why I’ve come up with 5 different recipes with pesto pasta as the base, to reduce repetitiveness.  If you still can’t stand eating pasta for 5 days, you can make 5 meals, and freeze each portion for another day, or just give some to your other half to take to work.   The process of making these 5 meals should only take 30 minutes. (Highlighted in bold, because, I’m sure even the busiest of people can find 30 minutes a week). So these can be made on Sunday afternoon and stored in the fridge during the week.

IMG_5935.jpg

Ingredients for 5 meals = £5

  • 1 jar (190g) of pesto (98p from Asda – this brand is really tasty and good value)
  • 500g pasta (50p from most supermarkets)
  • A handful of spinach (approximately 10p worth of spinach)
  • 10 washed cherry tomatoes (5p worth of tomatoes)
  • 6 cloves of garlic (5p worth of garlic)
  • 50g smoked salmon (£1 worth of salmon)
  • 1 mackerel fillet (70p worth of mackerel)
  • 1 chicken breast (80p)
  • 5 slices of salami (50p worth of salami)
  • 100g grated cheddar cheese (30p worth of cheese)
  • 1 tbsp olive oil

Top tip: if you need to buy larger amounts of the ingredients listed, you can freeze extras so they don’t go to waste (always check the storage instructions first).

Method:

  • Start by boiling your pasta in a saucepan according to the instructions. Whilst this is cooking, finely chop your garlic cloves and pan fry in the olive oil for 1 to 2 minutes until golden.
  • Once your pasta has cooked, drain and stir in your pesto and garlic.  This will act as your base for the rest of your dishes.  Separate your pasta mixture into 5 tupperware boxes (I like Lock and Lock because they’re totally leakproof).

1. The Veggie

IMG_5676

  • Panfry your cherry tomatoes and spinach for 2-3 minutes and add to box one.
  • You could also add leeks, onions, mushrooms or peppers according to taste.

2. The Chicken

  • Next, panfry your chopped chicken breast until cooked through and add into the second box.
  • Make sure you stir in thoroughly so the chicken breast is covered in pesto too.

3. The Salami
4. The Salmon
5. The Mackerel 

IMG_5372

  • The next three dishes are as simple as slicing up your salami, salmon and mackerel into small pieces and stirring through your pasta. (Note: if you are going to freeze these dishes, freeze without the salami as most can’t be frozen)
  • Grate your cheese and sprinkle on top of each portion. You could also add some black pepper.
  • Store in the fridge and take to work each morning!

So, it’s really as simple as that. 30 minutes, 5 meals, £1 each.  You’ll save money, and eat better…. and then you can go ahead and book that trip to Thailand!

Mexican Eggs

Overall time needed: 15 minutes

If you’re looking for a healthy recipe packed with protein whilst being super tasty, these Mexican eggs are one to try! They’re really quick to prepare making them a perfect midweek meal idea, and are also vegetarian, so are great for any of you who celebrate Meat-Free-Mondays!

IMG_4253

Ingredients (Serves 2):

  • 3 mushrooms (sliced)
  • 5 cloves of garlic (finely chopped)
  • 2 eggs
  • 10 cherry tomatoes (chopped in half)
  • 50g sweetcorn
  • 100g black beans
  • Few sprigs of coriander
  • Few basil leaves
  • 1 teaspoon paprika
  • 1 teaspoon chilli flakes
  • Salt and pepper to season
  • 25g feta cheese
  • 1 tablespoon olive oil

Method:

  1. Add your olive oil, mushrooms, sweetcorn and black beans to a frying pan and cook on a low heat for 1 – 2 minutes.  The heat should remain low throughout this recipe to avoid the ingredients burning.
  2. After this, add the cherry tomatoes and paprika, chilli flakes, garlic and salt and pepper and toss the ingredients to they are covered in the spices.
  3. Crack the eggs into the pan and cover until the eggs are cooked through (this should take around 2 minutes for a runny yolk or around 4 minutes for a hard yolk)
  4. Turn the heat off and add the coriander and basil leaves to the pan and then crumble the feta cheese on top.

IMG_4256

Easter Rocky Road

Prep time: 25 minutes 

Makes approximately 30 squares

I love Easter (Probably because I was born on Good Friday!). But also because Easter chocolate is better than any other type of chocolate! This Easter Rocky Road recipe is full of Oreo Easter Eggs, Mini Eggs and M&Ms… And lots of other things that are super delicious and not very good for you!


These Rocky Road bites honestly taste amazing… I took a batch to the office and they were literally gone within seconds. The soft marshmallows and the crunchy biscuits provide the perfect combination of textures. The marbled finish also makes them so pretty and perfect for serving the family over Easter.  It’s so easy to make, and doesn’t even require baking!


Ingredients:

  • 200g Dark Chocolate (this can be any type or brand of chocolate – I like to use Asda’s Smartprice brand, it’s so cheap, yet is one of the best tasting chocolate I’ve tried!)
  • 200g White Chocolate (this should be a ‘best for baking’ type of chocolate, to avoid curdling)
  • 100g mini marshmallows
  • 2 tablespoons golden syrup
  • 125g unsalted butter
  • 90g mini eggs 
  • 90g mini Oreo eggs (these can also be substituted for mini creme eggs)
  • 160g digestive biscuits
  • A handful of pink cake decorations including hundreds of thousands and mini hearts.
  • 50g M&Ms
  • Pink food colouring 
  • Blue food colouring 

Method:

  1. Line a square cake tin with baking parchment.
  2. Melt your dark chocolate, golden syrup and butter in a saucepan over a low heat. 
  3. Place your digestive biscuits in a sandwich bag and smash with a rolling pin until the biscuits are around the size of 5p pieces. Add these to your saucepan and stir until all the biscuit pieces are covered in the chocolate mixture. Add half of the mini eggs and half of the marshmallows to the mixture and stir so they are mixed together.
  4. Pour your mixture into your baking tray and pat down firmly with a wooden spoon. Add a few more mini eggs and marshmallows on the top but make sure there are still some left over for the topping.
  5. Divide your white chocolate into 3 glass bowls and bring a saucepan full of water to boil. Melt the first batch of white chocolate in the bowl over the saucepan. Leave this batch uncoloured. Once melted, drizzle over your biscuit mixture in the cake tin. Add a few more mini eggs, marshmallows, Oreo eggs chopped in half, and a few m&ms on top.
  6. Melt your next batch of white chocolate and add the pink food colouring. Drizzle over your mixture in the cake tin to create a marbled effect. Add a few more mini eggs, marshmallows, Oreo eggs chopped in half, and a few M&Ms on top.
  7. Melt your final batch of white chocolate and add the blue food colouring. Drizzle over your mixture in the cake tin to create a marbled effect and add your remaining mini eggs, marshmallows, Oreo eggs, M&Ms and sprinkle your pink cake decorations over the top. 
  8. Refrigerate for 2-3 hours, until hard. 
  9. Cut your Rocky Road into small squares and store in the fridge for up to 2 weeks (if they last that long!!)

Courgetti Bolognese 

Overall time needed: 1 hour 15 minutes 

I’ve been a bit naughty this weekend and may have overindulged in carbs and chocolate yesterday! (Don’t get me wrong, I’m all for a balanced diet and am a firm believer in the importance of carbohydrates… But 5 plates of pasta is probably too much!)  So today I’ve tried to make up for it by whipping up my Courgetti Bolognese. It’s packed with protein and loadsa veg and is a perfect Sunday night dinner. Plus any leftovers can be taken to work for lunch on Monday! I used lamb mince but this could be easily substituted with beef or turkey if you prefer.


To make this recipe you’ll need a spiralizer – one of the worlds greatest inventions!! It’s so useful, not just for courgetti, but for making vegetable crisps and also jazzing up boring salads. If you haven’t got one yet I’d wholeheartedly reccomend it. 


Ingredients:

  • 1 tbsp olive oil
  • 250g lamb mince (this could be substituted for beef or turkey)
  • 1 large onion, finely chopped
  • 4 garlic cloves, crushed
  • 1 large carrot, peeled and diced
  • 150g mushrooms, roughly chopped
  • 1 tbsp tomato purée
  • 1 red pepper 
  • 1 stick of celery 
  • 400g chopped tomatoes
  • 1 chicken stock cube (450ml boiling water)
  • Pinch of salt and crushed black pepper 
  • 2 courgettes
  • grated cheddar cheese, to serve 

Method:

1. Heat the olive oil in a pan and add the lamb mince. Fry until browned and then set aside in a bowl.

2. Fry the onion on a low heat for 5 minutes, then add the garlic, carrot, red pepper, celery and mushrooms and cook for another 5 minutes until softened. Re-add the mince to the pan. 

3. Add the tomato purée and the chopped tomatoes and stir so all the ingredients are mixed together. Add the salt and pepper. 

4. Add the chicken stock in boiling water and then lower the heat to simmer for around 45 minutes until the sauce has thickened. 

5. Whilst the sauce is brewing spiralize your courgettes using a spiralizer. 

6. When the sauce is ready, add your courgetti to the pan and cook for 3-4 minutes until lightly softened. 

7. Serve and top with some grated cheese. Enjoy!

Spicy Chicken and Chickpea Salad 


I am a firm believer of packed lunches, and spend most of my Sunday evenings meal-prepping for the week. Hence why I’m super excited to launch this new ‘packed lunch’ recipe section on my blog! I genuinely hate spending money on an overpriced salad or sandwich from a supermarket for lunch, plus home cooking is always healthier.
Also, on a side note, I love this lunchbox, which was a birthday gift from my lovely colleagues because I get so hungry that I usually end up eating my lunch by 11:30am!

Over the years I’ve come up with some great recipes which I can’t wait to share with you guys… Starting with my spicy chicken and chickpea salad! Now that the weather’s (finally) getting warmer I’m switching up my soups to salads. This salad is packed with protein meaning it’s actually filling and will keep you going throughout the day. I find it doesn’t really need a dressing because the seasoning on the chicken and the chickpeas ends up spreading and diffusing through the salad, but you can add a dressing of your choice if you prefer!

Prep time: 20 minutes 

Ingredients:

  • 1 chicken breast, chopped into small cubes 
  • 50g chickpeas 
  • 25g sweetcorn 
  • 3 sundried tomatoes, chopped into slices 
  • 25g mozzarella cheese, chopped into small chunks 
  • A handful of rocket leaves 
  • 10 olives 
  • 8 cherry tomatoes 
  • 25g cucumber, chopped into small cubes 
  • 2 teaspoons paprika 
  • 1 teaspoon garam masala 
  • 1 teaspoon ground coriander 
  • 1 teaspoon mustard seeds
  • Pinch of salt and pepper
  • 1 clove of garlic, finely chopped

Method:

1. Fry the chicken cubes in olive oil on a medium heat for 5 minutes, or until cooked through. 

2. Add the chickpeas and sweetcorn to the pan. Then add the mustard seeds, garlic, paprika, garam masala, ground coriander and a pinch of salt and pepper to the pan and cook in the spices on a low heat and leave to simmer for 5 minutes. Leave to cool while you prepare the rest of the salad.

3. Add the rocket leaves, cherry tomatoes, cucumber, sundried tomatoes, olives and mozzarella to your lunch box and then add the cooked chicken and chickpea mix. Toss the salad so that all the ingredients are mixed together. 

4. Store in the fridge until ready to eat and then enjoy!

Chocolate Biscuit Bites

img_0225

I originally saw this recipe being made on Blue Peter over a decade ago! They called it ‘Blue Peter Party Cake’, but then a few years later my best friend came over with the same exact cake calling it ‘Polish Cake’.  Either way, it’s been a firm favourite in our household ever since, and we now call it ‘Chocolate Biscuit Bites’ because, well, that’s basically what it is!

They are super buttery and delicious and basically taste like biscuits dunked in hot chocolate.  What’s not to like?

img_0224

Prep time: 15 minutes 

Ingredients:

  • 225g plain biscuits (I used plain digestive biscuits)
  • 110g margarine
  • 1 tablespoon golden syrup
  • 2 dessertspoons cocoa
  • 2 dessertspoons drinking chocolate
  • 1 dessertspoon caster sugar

Method:

  1. Break up your biscuits by placing them in a freezer bag and smashing them with a rolling pin.  Break until they are around the size of 5p pieces.
  2. In a saucepan, mix the margarine, the golden syrup, cocoa, sugar and drinking chocolate over a low heat until combined.
  3. Once they’ve all melted together, pour the mixture over the biscuits and mix it all together with a wooden spoon.
  4. Spoon the mixture into a well greased cake tin, I used a square one so it can be cut into mini squares but you can also use a circular one if you prefer.
  5. Put some greaseproof paper on top and then, to keep it tightly packed together, stick a plate on top and then a couple of tinned soups or beans to weigh it down.
  6. Leave to set overnight in the fridge, then remove and cut into squares.
  7. Store in an airtight container at room temperature, enjoy!

Thai Green Curry with Chicken

In November I spent a few weeks in Asia, firstly stopping in Bangkok for my cousin’s wedding followed by a relaxing few days in Phuket and then on to visit my best friend in Hong Kong! Whilst in Phuket I did an AMAZING Thai cookery class at the JW Marriott Ginja Cookery School. 

The Ginja Cookery School at the JW Marriott Resort, Phuket


Our instructor, Chef Kong, was great. He was super knowledgable and cooked us the best Pad Thai I’ve ever tasted (Mine sadly didn’t turn out as well as his!). We even got a chance to visit a local market. 

Chef Kong at the Ginja Thai Cookery School


Pad Thai


Here is the recipe for the Thai green curry that I learnt on the course. I’ve found that although you can buy a pre-prepared curry paste in the supermarket, the curry tastes 100 times better when you make it yourself. Plus, it’s not as difficult or as time consuming as I had thought, especially if you have a food processor. 

Thai Green Curry with Chicken


I’ve slightly tailored this recipe to British tastes and ingredients, as there were a few authentic Thai ingredients which I’ve found difficult to come across in the UK, don’t worry, it tastes just as good!
Ingredients:

For the green curry paste:

  • 2 green chillies (for a medium spiced curry)
  • 1 lemongrass stick 
  • 1 tablespoon fresh corriander 
  • 1/2 tablespoon lime zest 
  • 1 shallot 
  • 6 garlic cloves 
  • 7 pieces of peppercorns 
  • Pinch of salt 
  • 1 teaspoon shrimp paste 
  • Thumb sized stick of fresh ginger 
  • 1 teaspoon of ground turmeric 
  • Thumb sized stick of galangal ginger 

For the curry 

  • 2 tablespoons vegetable oil 
  • 100g chicken breast, sliced into small pieces 
  • 50ml chicken stock 
  • 150ml coconut milk 
  • 1 aubergine, sliced into small chunks 
  • 2 kaffir lime leaves 
  • 1 big red chilli, sliced vertically in half 
  • 1 tablespoon palm sugar (or brown sugar)
  • 1 tablespoon fish sauce or light soy sauce 
  • Pinch of salt 

Method

1. Put all ingredients for the curry paste in a food processor and blitz until a paste forms.

2. Heat up the oil in a pan and add the curry paste until the aroma develops.

3. Add the chicken stock, aubergine and coconut milk and simmer on a low temperature for 5 minutes.

4. Add the chicken, kaffir like leaves and simmer until the chicken is cooked 

5. Add the fish sauce, Palm sugar, and garnish with the red chilli.

6. Serve alongside rice, or even quinoa! Which is what I use to take to work as a packed lunch. Enjoy!

Nutella Granola

Sometimes, the best cure for a Monday is… A big dollop of Nutella! Seriously, I actually believe that Nutella fixes most of life’s problems, or at least definitely improves them 🤔. Hence why I’ve just whipped up a batch of my Nutella granola. 😍

It can be eaten dry as a snack, or even served with milk to make a tasty cereal. It tastes even better if you use hazelnut milk. I’m normally one for healthy eating and would never usually have anything chocolatey for breakfast, but sometimes you’ve just gotta #treatyoself 🙈


Ingredients 

  • 250g rolled oats
  • 2 tablespoons coconut oil 
  • 90g Nutella 
  • 2 tablespoons honey
  • 50g walnuts 
  • 50g almonds
  • 50g chocolate chips 

Method 
1. Preheat your oven to Gas Mark 3 and line a baking tray with baking paper.

2. Melt the Nutella, coconut oil and honey over a low heat until combined.

3. Pour the rolled oats into a mixing bowl and pour the melted Nutella mixture over it and stir until all the oats are covered. 

4. Stir in the almonds, walnuts and chocolate chips then lay the mixture on the baking tray 

5. Bake for 30 minutes. 

6. Leave to cool, then store in an airtight container at room temperature for up to 3 weeks.